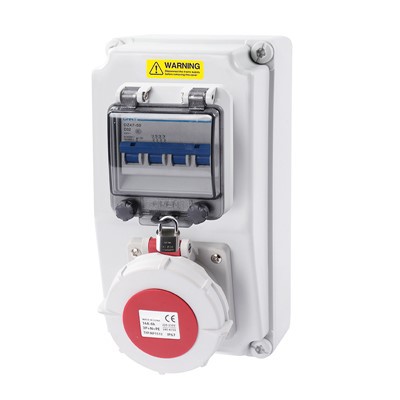

Installing an ABS Power Distribution Box is a task that requires careful planning and execution. As a supplier of ABS Power Distribution Box, I've had the opportunity to see firsthand the importance of a proper installation. In this blog post, I'll guide you through the process of installing an ABS power distribution box, from preparation to the final steps.
Preparation
Before you start the installation process, it's crucial to gather all the necessary tools and materials. Here's a list of what you'll need:
- ABS Power Distribution Box: Ensure that the box you've chosen is suitable for your specific application. Consider factors such as size, capacity, and the number of circuits you need to accommodate.
- Screwdriver: A Phillips or flat - head screwdriver, depending on the type of screws used in the box and for mounting.
- Drill: If you need to make holes for mounting the box or for cable entry.
- Measuring Tape: To accurately measure the space where the box will be installed and the length of cables.
- Electrical Cables: Select the appropriate gauge of cables based on the electrical load. Make sure the cables are rated for the voltage and current requirements of your system.
- Cable Clamps: To secure the cables inside the box and prevent them from moving around.
- Wire Nuts: For connecting wires together safely.
- Mounting Brackets: If the box needs to be mounted on a wall or other surface.
Site Selection
The location where you install the ABS power distribution box is critical. Here are some factors to consider:
- Accessibility: The box should be easily accessible for maintenance and inspection. Avoid placing it in areas that are difficult to reach, such as behind large equipment or in cramped spaces.
- Ventilation: Adequate ventilation is necessary to prevent overheating. Ensure that there is enough space around the box for air to circulate.
- Protection from Elements: If the box is installed outdoors, it should be protected from rain, snow, and direct sunlight. You may need to use a weatherproof enclosure or install it in a sheltered area.
- Proximity to Power Source: The box should be located close to the main power source to minimize cable length and reduce voltage drop.
Mounting the Box
Once you've selected the site, it's time to mount the ABS power distribution box. Follow these steps:
- Mark the Mounting Holes: Use a measuring tape to mark the positions of the mounting holes on the wall or surface. Make sure the marks are level and aligned with the holes in the box.
- Drill the Holes: Use a drill to create holes at the marked positions. The size of the holes should match the diameter of the mounting screws or bolts.
- Attach the Mounting Brackets (if required): If the box comes with mounting brackets, attach them to the box using the provided screws. Then, align the brackets with the holes in the wall and secure them using screws or bolts.
- Mount the Box: Lift the box and place it on the mounting brackets or directly onto the wall. Insert the mounting screws or bolts through the holes in the box and tighten them securely.
Wiring the Box
Wiring the ABS power distribution box is a complex process that requires a good understanding of electrical systems. Here's a step - by - step guide:
- Turn Off the Power: Before you start wiring, make sure the main power supply is turned off to avoid the risk of electric shock.
- Prepare the Cables: Cut the electrical cables to the appropriate length. Strip the insulation from the ends of the cables using a wire stripper. The length of the stripped section should be sufficient to make a secure connection.
- Connect the Input Cables: The input cables are the ones that bring power into the distribution box. Connect the live, neutral, and ground wires from the main power source to the corresponding terminals in the box. Use wire nuts to secure the connections.
- Install Circuit Breakers or Fuses: Depending on your system requirements, install circuit breakers or fuses in the appropriate slots in the box. Make sure they are rated for the correct amperage.
- Connect the Output Cables: The output cables are the ones that distribute power to various electrical devices. Connect the live, neutral, and ground wires of the output cables to the terminals of the circuit breakers or fuses. Again, use wire nuts to secure the connections.
- Organize the Cables: Use cable clamps to secure the cables inside the box and keep them organized. This will make it easier to troubleshoot and maintain the system in the future.
Testing and Inspection
After the installation and wiring are complete, it's essential to test the system to ensure it's working properly. Here's what you need to do:
- Turn On the Power: Carefully turn on the main power supply. Check for any signs of electrical arcing, sparks, or unusual noises.
- Check the Circuit Breakers: Test each circuit breaker by turning it on and off. Make sure they trip when the load exceeds the rated amperage.
- Measure the Voltage: Use a multimeter to measure the voltage at the output terminals of the distribution box. The voltage should be within the acceptable range for your electrical devices.
- Inspect the Connections: Check all the wire connections to make sure they are tight and secure. Look for any signs of loose wires or damaged insulation.
Safety Considerations
Installing an ABS power distribution box involves working with electricity, so safety should be your top priority. Here are some safety tips:


- Wear Protective Gear: Always wear safety glasses, gloves, and appropriate clothing when working with electrical systems.
- Follow Electrical Codes: Make sure your installation complies with local electrical codes and regulations. This will ensure the safety and reliability of the system.
- Use Proper Tools: Use only tools that are designed for electrical work. Inspect the tools regularly to make sure they are in good condition.
- Avoid Overloading: Do not exceed the rated capacity of the distribution box or the circuit breakers. Overloading can cause overheating and increase the risk of fire.
Conclusion
Installing an ABS power distribution box is a challenging but rewarding task. By following the steps outlined in this blog post, you can ensure a safe and successful installation. As a supplier of ABS Power Distribution Box, we are committed to providing high - quality products and support to our customers. If you have any questions or need assistance with your installation, or if you're interested in purchasing our ABS power distribution boxes, please feel free to contact us for a purchase negotiation.
References
- National Electrical Code (NEC)
- Manufacturer's Installation Manuals for ABS Power Distribution Boxes